Archive for the ‘Programming’ Category.

Openvpn server an Deutsche Glasfaser IPv6 only Router und feste-ip.net

OpenVPN auf BananaPi M2 Zero W mit Raspbian

Deutsche Glasfaser Genexis Router in Verbindung mit feste-ip.net zur Umsetzung ipv4 nach ipv6

Ich versuche hier meine Installation basierend auf den nachfolgenden Quellen zusammenzufassen.

Quellen: https://wiki.ubuntuusers.de/OpenVPN/ und https://blog.sengotta.net/openvpn-server-am-unitymedia-ds-lite-anschluss-betreiben/

Nachfolgend sind persönliche Angaben in < und > gesetzt. IP Addressen sind in der Form durch x ersetzt.

Feste-ip.net Universal Portmapper einrichten

Über https://test-ipv6.com/ die öffentliche IP6 Adresse des Servers (VPN Gateway) ermitteln.

Feste-IP.net Portmapper

Bei feste-ip.net habe ich eine Port Weiterleitung auf die öffentliche IPv6 Addresse des BananaPi (dem OpenVPN Server) und den Port 443 unter “Universelle Portmapper” angelegt.

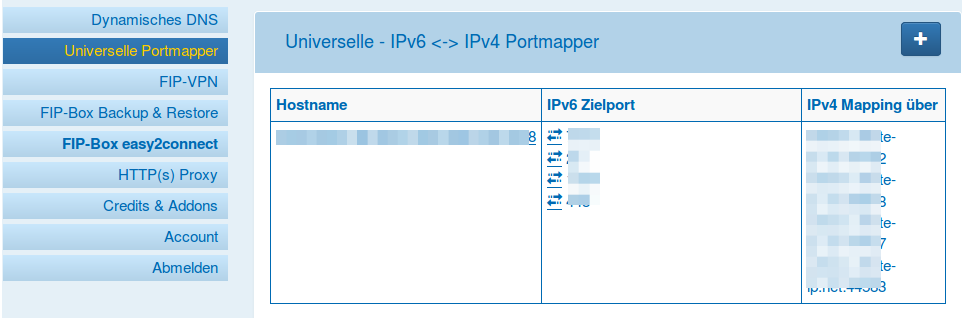
Ich habe hier den Port 443 gewählt da dieser auch in vielen Fremdnetzen (zb Mobilfunk Netze) funktioniert. Der Standard VPN Port 1194 ist möglicherweise in dem einen oder anderen Netz gesperrt.

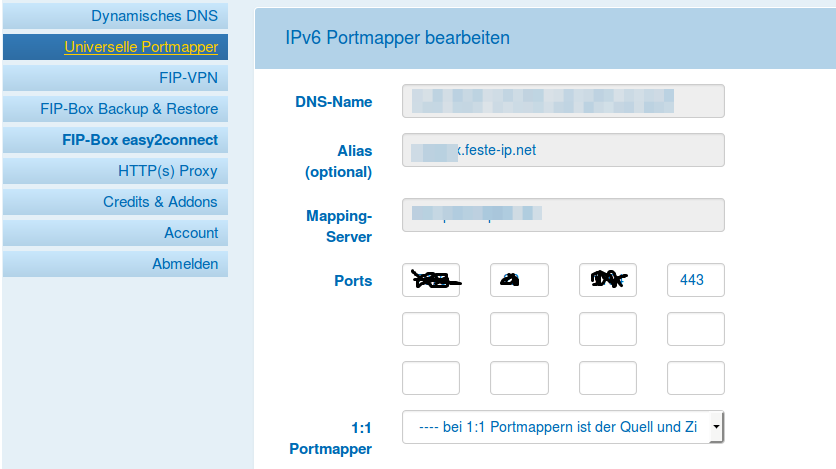
Ich habe einen Alias gewählt den ich mir leichter merken kann als den DNS-Namen. Ausserdem laufen auf demselben BananaPi M2 Zero W noch drei weitere Dienste. Diese sind über den gleichen Alias unter drei anderen Ports erreichbar.

In der Client.conf muss später der Alias Name und der gemapte Port angegeben werden, da die Verbindung nicht über IPv6 und Port 443 hergestellt wird. Siehe client.con Zeile:

remote <aliasname>.feste-ip.net <auf 443 umgeleiterter port>

Openvpn Server einrichten

Continue reading ‘Openvpn server an Deutsche Glasfaser IPv6 only Router und feste-ip.net’ »

FHEM: Home Automation remote display using small OLED and MQTT

I wanted to have a small display with some essential Home Automation data. So I buy an 1.3″ OLED display with I2C interface and started to look for some existing code for an ESP8266. The display should be feed using WiFi and be portable, so I can place it where needed.

I started with ESPeasy, as there is already support for multiple pages with text lines. Unfortunately the code is written to show sensor data of directly connected sensor only. No option to publish free text or data from a Home Automation system. The ESPeasy code will save the text to flash memory on every change when using the Web GUI. The flash memory would wear out after some month with my use case.

Finally I decided to start my own code. First I had to find out that the OLED display is not an SD1306 but a SH1106 one. Although some people state that these are more or less the same, the SD1306 libraries did not work for me. Then I found https://github.com/ThingPulse/esp8266-oled-ssd1306 which works well for me.

Starting with SSD1306UiDemo.ino I added WiFi and MQTT libaries and code.

My code will show 6 lines of text on two frames (3 lines each). The frames will change every 5 seconds. The content of the text lines is published by a FHEM server. As there was no easy way to integrate the display using a MQTT_DEVICE definition in FHEM, I wrote my own perl mqttmsg sub function and used the FHEM notify definition to publish changes to the display.

a small video

Continue reading ‘FHEM: Home Automation remote display using small OLED and MQTT’ »

Android: Print PDF to Thermal Portable Wireless Printer

Recently I got the request to write an application that prints a PDF file on a portable Thermal printer.

Normally that does not make sense, as the protable printers come with 2, 3, 4 or 5 inch paper width only. But the PDF files are created for 3 inch paper and os this Receipt printing makes sense.

The idea was to render the PDF to a bitmap and then print the bitmap to the printer. These printers do not support PDF or Postscript, they come with special Printer Language support as called ZPL, ESP/P, CPCL or others. So we need to create a Bitmap of the PDF first and then print the Bitmap.

I started using the Android Google PDFRenderer but this fails with two issues: the bitmaps created are always transparent and print with black background where white has to be; the text was not rendered as the Fonts did not render.

Among others I found PDFbox and after fixing a small issue with scaling of bitmaps the solution works very well.

The CPCL_Sample code and application can load a PDF file. This is then converted to a scaled bitmap which can then be printed to a CPCL compatible printer. The CPCL performance is very different and printing on a Zebra takes about a minute for a 3 by 4 inch sized bitmap.

The code has to use a lot of intents and background tasks as most processing takes some time. The bitmap is created by an IntentService. The Sewoo SDK prints the bitmap first to a queue buffer and there is no control or feedback about the status of the print job. So it hopefully prints after some time.

By replacing the print SDK you should be able to print the bitmap of the rendered PDF to any Bitmap-Printing capable printer.

Be warned: there are Printers that are compatible with a Printer Language like CPCL but may not support Bitmap printing.

Source code and apk at github.

FHEM: serielle Devices über Netzwerk anschliessen

Zu Testzwecken brauche ich ab und an neben meinen Haupt FHEM System ein zweites FHEM System, zB auf meinem Netbook. Nun sind drei Devices (nanoCUL 433MHz, nanoCUL 868MHz und ein Jeelink) direkt am Hauptserver über USB (serial) angeschlossen. Wenn ich diese in einem Testsystem benötige, müsste ich die Geräte vom Hauptserver trennen. Wie praktisch wäre es, wenn ich diese USB Devices über das Netzwerk anbinden könnte, so wie dies über EspLink mit dem angschlossenen Arduino Nano mit SignalDuino Firmware möglich ist.

Nun zur Anbindung von seriellen Geräten an das Netzwerk gibt es für Linux ser2net. Leider ist die Original-Version nicht multi-Client tauglich und würde nur einem Client die Verbindung erlauben. Bei EspLink sind jedoch mehrere Clients möglich. Obwohl die meisten ser2net Quellen nur einen Client unterstützen, gibt es ein oder zwei Quellen, deren Implementierung mehrer Clients unterstützen.

Nachdem ich einen Quellcode von ser2net mit multi-Client Support geladen und nach geringen Modifikationen auch erfolgreich implementieren konnte, kann ich nun alle Geräte, die am Haupt FHEM Server angeschlossen sind auch über mein Netzwerk nutzen. Die Geräte mussten nur in der ser2net conf Datei mit verschiedenen Netzwerkports eingetragen werden:

2301:raw:0:/dev/serial/by-id/usb-FTDI_FT232R_USB_UART_A9YDLRJV-if00-port0:38400,8DATABITS,NONE,1STOPBIT
2302:raw:0:/dev/serial/by-id/usb-FTDI_FT232R_USB_UART_A94BBD91-if00-port0:38400,8DATABITS,NONE,1STOPBIT

In der fhem.cfg wurden die Geräte entsprechend umdefiniert:

#define nanoCUL433 CUL /dev/serial/by-id/usb-FTDI_FT232R_USB_UART_A9YDLRJV-if00-port0@38400 1234
define nanoCUL433 CUL 192.168.0.40:2301 1234
#define nanoCUL868 CUL /dev/serial/by-id/usb-FTDI_FT232R_USB_UART_A94BBD91-if00-port0@38400 3421
define nanoCUL868 CUL 192.168.0.40:2302 4321

Die original EspLink Anbindung des Arduino Nano mit SignalDuino Firmware:

define sduinoIP SIGNALduino 192.168.0.99:23

Mit diesen Änderungen kann ich diese USB Geräte nun auch über das Netzwerk benutzen.

Meine Abwandlung von ser2net findet sich auf Github.