Archive for the ‘FHEM’ Category.

FHEM: Battery powered Home Automation remote display using small OLED and MQTT

This is the successor of my MQTT remote display. It is battery driven and can so be placed where you want.

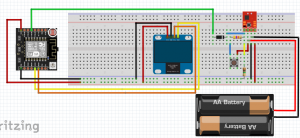
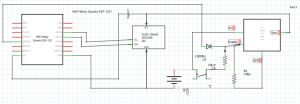
The main component is a Pololu U1V11F3, a step up/down converter with 3V3 output and an Enable input pin. Unfortunately the Enable pin is already clamped to Vin via a 100K resistor. For me I had to remove the small SMD resistor to have the circuit powered off normally. The R6/100K is located directly to the Enable in Input connectors of the Pololu board.

The Enable pin is then connected to GND via an 1M resistor to ground. Do not leave the Enable pin floating, it will sense a finger tip already and switch to on/off by accident.

Then I added a momentary switch and a 47K resistor between Vin (the battery Plus) and the Enable pin. If the switch is pressed, the converter starts and gives 3V3 on it’s Output pin. This powers the ESP12 and the OLED display. But only as long as you press the switch. So I added a Diode from GPIO14 of the ESP-12 to the Enable pin.

In the code, GPIO14 is set as output and immediately set to high. This will enable the converter even when the switch is released.

After some code cycles, the GPIO14 output is set to low and the power of the converter is shut down.

The converter will not drain the battery in shutdown mode. But you need to press and hold the switch 2 or 3 seconds until the code powers the Enable pin.

FHEM: Home Automation remote display using small OLED and MQTT

I wanted to have a small display with some essential Home Automation data. So I buy an 1.3″ OLED display with I2C interface and started to look for some existing code for an ESP8266. The display should be feed using WiFi and be portable, so I can place it where needed.

I started with ESPeasy, as there is already support for multiple pages with text lines. Unfortunately the code is written to show sensor data of directly connected sensor only. No option to publish free text or data from a Home Automation system. The ESPeasy code will save the text to flash memory on every change when using the Web GUI. The flash memory would wear out after some month with my use case.

Finally I decided to start my own code. First I had to find out that the OLED display is not an SD1306 but a SH1106 one. Although some people state that these are more or less the same, the SD1306 libraries did not work for me. Then I found https://github.com/ThingPulse/esp8266-oled-ssd1306 which works well for me.

Starting with SSD1306UiDemo.ino I added WiFi and MQTT libaries and code.

My code will show 6 lines of text on two frames (3 lines each). The frames will change every 5 seconds. The content of the text lines is published by a FHEM server. As there was no easy way to integrate the display using a MQTT_DEVICE definition in FHEM, I wrote my own perl mqttmsg sub function and used the FHEM notify definition to publish changes to the display.

a small video

Continue reading ‘FHEM: Home Automation remote display using small OLED and MQTT’ »

FHEM: serielle Devices über Netzwerk anschliessen

Zu Testzwecken brauche ich ab und an neben meinen Haupt FHEM System ein zweites FHEM System, zB auf meinem Netbook. Nun sind drei Devices (nanoCUL 433MHz, nanoCUL 868MHz und ein Jeelink) direkt am Hauptserver über USB (serial) angeschlossen. Wenn ich diese in einem Testsystem benötige, müsste ich die Geräte vom Hauptserver trennen. Wie praktisch wäre es, wenn ich diese USB Devices über das Netzwerk anbinden könnte, so wie dies über EspLink mit dem angschlossenen Arduino Nano mit SignalDuino Firmware möglich ist.

Nun zur Anbindung von seriellen Geräten an das Netzwerk gibt es für Linux ser2net. Leider ist die Original-Version nicht multi-Client tauglich und würde nur einem Client die Verbindung erlauben. Bei EspLink sind jedoch mehrere Clients möglich. Obwohl die meisten ser2net Quellen nur einen Client unterstützen, gibt es ein oder zwei Quellen, deren Implementierung mehrer Clients unterstützen.

Nachdem ich einen Quellcode von ser2net mit multi-Client Support geladen und nach geringen Modifikationen auch erfolgreich implementieren konnte, kann ich nun alle Geräte, die am Haupt FHEM Server angeschlossen sind auch über mein Netzwerk nutzen. Die Geräte mussten nur in der ser2net conf Datei mit verschiedenen Netzwerkports eingetragen werden:

2301:raw:0:/dev/serial/by-id/usb-FTDI_FT232R_USB_UART_A9YDLRJV-if00-port0:38400,8DATABITS,NONE,1STOPBIT
2302:raw:0:/dev/serial/by-id/usb-FTDI_FT232R_USB_UART_A94BBD91-if00-port0:38400,8DATABITS,NONE,1STOPBIT

In der fhem.cfg wurden die Geräte entsprechend umdefiniert:

#define nanoCUL433 CUL /dev/serial/by-id/usb-FTDI_FT232R_USB_UART_A9YDLRJV-if00-port0@38400 1234
define nanoCUL433 CUL 192.168.0.40:2301 1234
#define nanoCUL868 CUL /dev/serial/by-id/usb-FTDI_FT232R_USB_UART_A94BBD91-if00-port0@38400 3421
define nanoCUL868 CUL 192.168.0.40:2302 4321

Die original EspLink Anbindung des Arduino Nano mit SignalDuino Firmware:

define sduinoIP SIGNALduino 192.168.0.99:23

Mit diesen Änderungen kann ich diese USB Geräte nun auch über das Netzwerk benutzen.

Meine Abwandlung von ser2net findet sich auf Github.

FHEM: Flugdaten mit py1090 loggen

Nun kann ich ja Flugdaten mit Hilfe von Jonas Lieb’s py1090 und adsbox in FHEM aufzeichnen. Dies wollte ich immer um die Aufzeichnung des aktuellen Geräuschpegels erweitern. Das Ergebnis sind Erweiterungen der py1090 Klassen und bessere python Ausgaben der aktuellen Daten.

Angefangen habe ich mit einfachen print-Anweisungen und einer seriellen Verbindung zu einem Arduino Nano, der als ADC Wandler für den Geräuschpegel diente. Nun läuft ein nodeMCU mit espEasy. Dadurch (wireless) kann ich den Geräuschpegel ‘Sensor’ unabhängig positionieren. Die Daten lese ich in Python über json vom espEasy. Die aktuellen ‘Lärm’-Daten werden alle x Minuten über einen Python Telnet Client Code an FHEM übermittelt.

Aufbau

Geräuschpegel-Sensor => nodeMCU mit ESPeasy =(WLAN)=> Python Script => FHEM-Logfile + Telnet FHEM

Anfangs habe ich versucht den ‘Sender’-Code direkt in LUA auf dem nodeMCU zu schreiben. Man stösst aber sehr schnell an Speichergrenzen und der Code läuft sehr unzuverlässig. Dagegen ist ESPeasy total einfach einzurichten und bietet direkt einen ADC Sensor. Nun kann man den Wert via MQTT weiterverarbeiten. Da ich aber den Geräuschpegel zusammen mit dem aktuell ‘nächsten’ Flugzeug versenden will, lese ich die Daten via JSON von ESPeasy in Python und versende sie dann zusammen mit den Flugzeugdaten via Telnet an FHEM.

Das erste Python Script verwendet nur einfache Print-Ausgaben für die aktuellen Aktivitäten. Der Inhalt scrollt ständig über den Bildschirm und man hat keine Übersicht.

dump1090

Daher habe ich den Python-Code so geändert, dass er zur Ausgabe curses verwendet:

dump1090term

Leider ‘zerschiesst’ es ab und an den Bildschirm und die Hervorhebung für das ‘nächste’ Flugzeug erstreckt sich dann auch mal über andere Zeilen. Ausserdem kann man das Terminal Fenster nicht in der Größe ändern. Meistens bricht dann der Curses Code und das Python Script ab.

Dann habe ich es noch mit der Python blessings Erweiterung versucht:

dump1090term_blessings

Nun kann man das Terminalfenster zwar im laufenden Betrieb in der Größe ändern, allerdings muß ich die Ausgabe noch besser anpassen (Kopfzeilen).

Ich habe in diesem Python Projekt möglichst mit Klassen und externen Modulen zu arbeiten. Dadurch kann man das Ganze leicht erweitern und anpassen.

Source Code