Archive for the ‘Programming’ Category.

Create Watchface with Zepp Editor for Amazfit

How to prepare and test a Zepp watchface

Done with Amazfit GTR 2E

Before you start, you need a lot of files prepared:

  • A background image to be used as watchface
  • A hour, minute and second dial, if you create an analog watchface
  • Digits and symbols to be used, for example the digits 0-9, a period, a percent, a ‘°C’, a distance unit (km) and others as you like to place on your watch face.

The background watchface for the GTR2E is 454×454 pixels. You need to know, how to do precise pixel images. The hands have to be symmetric, so they can easily rotate.

The digits can be created one by one using your favorite painting tool (i.e. Paint.Net, Inkscape or Painter or even GIMP). Another option is to use fontforge or the fontimage tool (Linux only) or a fontforge python script. Imagemagick is also useful if you need to invert or make the images transparent.

Fontimage example

Create a small text in white with transparent (black) background from Comic Sans Bold Truetype font:

fontimage --pixelsize 22 --text "km" -o km_comicsans1.png ComicSansMSBold.ttf
-or-
fontimage --pixelsize 22 --text "°C" -o gradCelsius_comicsans1.png ComicSansMSBold.ttf

Then invert the image (using imagemagick convert):

convert km_comicsans1.png -negate km_comicsans_n.png
-or-
convert gradCelsius_comicsans1.png -negate gradCelsius_comicsans_n.png

Finally make the black background transparent:

convert km_comicsans_n.png -transparent black km_comicsans.png
-or-
convert gradCelsius_comicsans_n.png -transparent black gradCelsius_comicsans.png

Another example for a bash script to generate digits:

#!/bin/sh
for n in 0 1 2 3 4 5 6 7 8 9 '.' ':' '%' '°C' 'km'
do
  fontimage --pixelsize 22 --text $n -o $n_1.png "ComicSansMSBold.ttf"
  convert $n_1.png -negate $n_n.png
  convert $n_n.png -transparent black $n.png
done

In the above script 22 is the pixel size of the images and ComicSansMSBold.ttf is the font to be used.

If you need to create more, single bitmaps at once, you may use a fontforge python script. I used to first load the font to be used into Fontforge and change the Encoding to Latin-1, mark the first 127 chars, invert the selection and delete the rest. Then save this as a Fontforge font file for later use.

Now you can use a small python script and export the remaining glyphs to single bitmap files:

import os
from fontforge import *

font = open(os.sys.argv[1])
font.reencode("iso8859-1")
for glyph in font:
  if font[glyph].isWorthOutputting():
    if glyph.isupper():
      name = glyph + "_capital"
    else:
      name = font[glyph].glyphname
      # or name it with ' + "_" + str(font[glyph].unicode)' added
      print ("glyph: " + glyph + ", unicode: " + str(font[glyph].unicode) + ", name: " + name + "\n")
      font[glyph].export("c:/temp/" + name + ".png", 22)

If you do not want to start this from command line, you may replace ‘os.sys.argv[1]’ by the path and name of your saved Fontforge font file or a TrueType font file. Be warned that you get many bitmap files now. Possibly do that within an empty new directory.

Now that you have your images ready, go on and start a watchface.

Assemble the Watchface

Continue reading ‘Create Watchface with Zepp Editor for Amazfit’ »
Beispiel Kunden-Programmierung: Honeywell BasicTE

Ein Honeywell Kunde möchte von CK3, Windows Mobile 6, Intermec Terminal Emulation zu Honeywell CK65, Android 9, Honeywell BasicTE wechseln.

Für die SAP Telnet/VT Anwendung werden zwei spezielle Anpassung notwendig:

  1. Beim  Drücken der F5 Taste soll die Zeichenfolge “~[35” (F21) zum Host gesendet werden
  2. Wenn GS1-128 Barcode Typen gescannt werden, sollen diese mit dem Präfix [C1 versehen werden.
  3. Das GS Symbol in GS1-128 Barcode Typen muß durch “#” ersetz werden.

Die oben genannten Bedingungen sind auf dem CK3 implementiert. Dort kann man zB den Symbology Identifier (Aim ID) nur für GS1-128 einsetzen lassen. Auf dem CK65 ist diese Aim ID Einfügung nur global für alle Barcode Typen einschaltbar. Die Ersetzung des GS Symbols (hex: 0x1D) ist auf dem CK3 ebenfalls von Haus aus möglich. Der CK65 bietet dies Möglichkeit im Zusammenhand mit Honeywell BasicTE nicht.

Die Tastenbelgung F5->”~[35″ ist in der BasicTE Anwendung über die Anpassung der CustomKeyboard.xml möglich, welche auch das Tastenlayout und die Funktionen der BasicTE Software Tastatur bestimmt.

Da die BasicTE den Barcode Scanner direkt ansteuert muß die Aim ID Einsetzung und die GS Symbol ersetzung über ein sogenanntes DataEdit Plugin realisiert werden. Dazu ist etwas Android Programmierung notwendig. Diese Android Programm erhält dann die Barcode Daten und den Typ über einen Broadcast und kann die Daten dann verändert zurückliefern.

Nach erstenTests und Korrekturen kann der Kunde nun das CK65 uneingeschränkt statt dem CK3 verwenden.

COVID-19 Infektionen in Deutschland

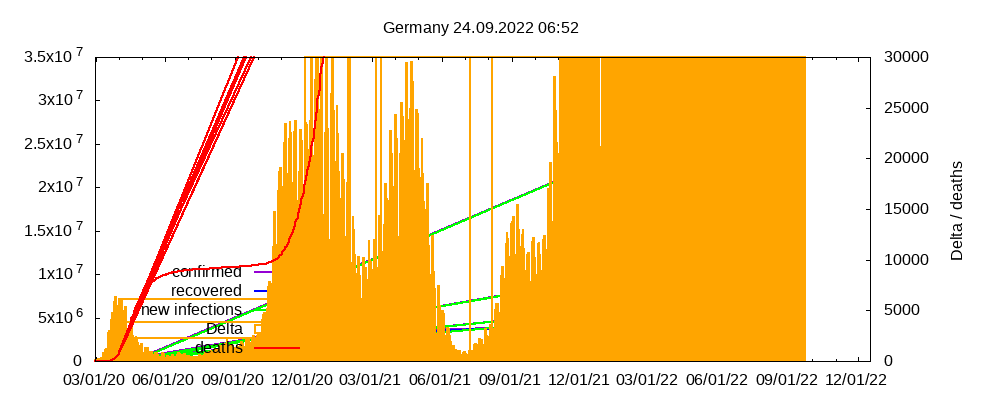
Auf meinem Github Account habe ich eine Bash Script Sammlung hinterlegt, mit der man die aktuellen COVID-19 Zahlen schnell in einem Plot sehen kann.

Die bereits verfügbaren grafischen Darstellungen waren mir in meinem Browser zu langsam. Deshalb habe ich meine eigene Darstellung mit Hilfe von Bash und GNUPlot erstellt:

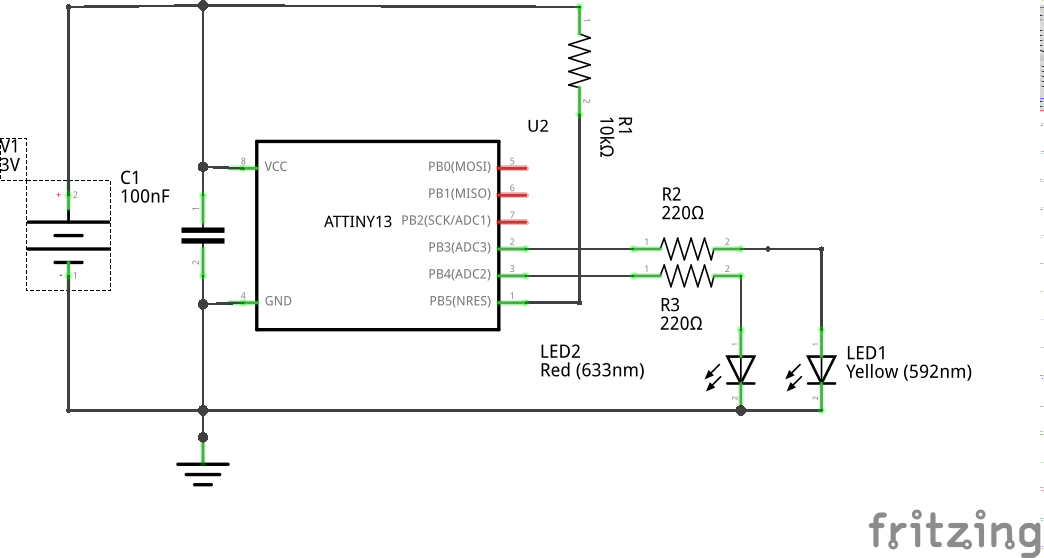
LED candle light with timer

LEDTimedCandle

I did a lot of research on battery powered LED candle lights circuits and code and was unable to find a time controlled LED candle light.

As I have some ATTiny13 left, I decided to use this little chip. As I want the LED to do a candle light for about 4hours and then stay of for another 20 hours, I need on timer and counter. Another timer/PWM is needed to immitate a candle flickering. But the ATTiny13 has only one timer. On the ATTiny13 you can either use the timer or PWM.

Fortunately the ATTiny has also a Watchdog timer that can be used to call an interrupt function. The watchdog runs with a separate 128kHz clock, independent from the CPU clock. The largest timeout is 8 seconds. So I need to count this 450 times to have one hour.

// watchdog interrupt
ISR (WDT_vect)
{
  sec8_counter++;

#ifdef USE_HEART_BEAT_LED  
  //flash heart beat LED
  digitalWrite(LED2, HIGH);
  delay(1);
  digitalWrite(LED2, LOW);
#endif
  
  if(sec8_counter>=HOUR_INTERVAL){
    sec8_counter=0;
    if(bLedIsOn==1){
      on_hours++;
      if(on_hours>=MAX_ON_HOURS){
        bLedIsOn=0; //switch to OFF mode
        off_hours=0;
      }
    }else{
      off_hours++;
      if(off_hours>=MAX_OFF_HOURS){
        bLedIsOn=1; //switch to ON mode
        on_hours=0;
      }
    }
  }
  wdt_reset();
}  // end of WDT_vect

The code makes the ATTiny13 sleep for another 8 seconds or light the LED. The ON phase is 4 hours and the sleep phase will be extended to 20 hours.

void loop ()
{
  //sleep 20 hours and work 4 hours
  noInterrupts();
  if(bLedIsOn==1){
    doCandle();
  }else{
    digitalWrite (LED, LOW); //ensure LED is OFF
   goToSleep ();
  }
  interrupts();
}  // end of loop

The sequence starts with the ON phase, when power is applied. In the ON phase I measure about 3mA and in the OFF phase the circuit needs 300µA.

The circuit is documented in the Arduino code file. Running the ATTiny13 at lower clock than 9.6MHz did not change the power usage. But I switched to the 1.2MHz internal clock and disabled BOD (auto power down for low power) to get a longer runtime with two or three AA batteries.

UPDATE 2019/03/10: The wdt calculation is wrong and I changed the 450 cycles for one hour to 388. See github README for full update. The main issue is that the ATTiny13 datasheet says 128kHz but means 131072Hz and not 128000Hz and the wdt oscilator never cycles that fast but more or less at around 113000Hz.

https://github.com/hjgode/LEDTimedCandle/tree/master

CREDITS to all that share their knowledge, especially:

https://github.com/MCUdude/MicroCore

http://forum.arduino.cc/index.php?topic=200590.0

https://electronics.stackexchange.com/questions/74840/use-avr-watchdog-like-normal-isr

http://www.ece.cmu.edu/~koopman/lfsr/index.html