Create Watchface with Zepp Editor for Amazfit
How to prepare and test a Zepp watchface
Done with Amazfit GTR 2E
Before you start, you need a lot of files prepared:
- A background image to be used as watchface
- A hour, minute and second dial, if you create an analog watchface
- Digits and symbols to be used, for example the digits 0-9, a period, a percent, a ‘°C’, a distance unit (km) and others as you like to place on your watch face.
The background watchface for the GTR2E is 454×454 pixels. You need to know, how to do precise pixel images. The hands have to be symmetric, so they can easily rotate.
The digits can be created one by one using your favorite painting tool (i.e. Paint.Net, Inkscape or Painter or even GIMP). Another option is to use fontforge or the fontimage tool (Linux only) or a fontforge python script. Imagemagick is also useful if you need to invert or make the images transparent.
Fontimage example
Create a small text in white with transparent (black) background from Comic Sans Bold Truetype font:
fontimage --pixelsize 22 --text "km" -o km_comicsans1.png ComicSansMSBold.ttf
-or-
fontimage --pixelsize 22 --text "°C" -o gradCelsius_comicsans1.png ComicSansMSBold.ttf
Then invert the image (using imagemagick convert):
convert km_comicsans1.png -negate km_comicsans_n.png
-or-
convert gradCelsius_comicsans1.png -negate gradCelsius_comicsans_n.png
Finally make the black background transparent:
convert km_comicsans_n.png -transparent black km_comicsans.png
-or-
convert gradCelsius_comicsans_n.png -transparent black gradCelsius_comicsans.png
Another example for a bash script to generate digits:
#!/bin/sh
for n in 0 1 2 3 4 5 6 7 8 9 '.' ':' '%' '°C' 'km'
do
  fontimage --pixelsize 22 --text $n -o $n_1.png "ComicSansMSBold.ttf"
  convert $n_1.png -negate $n_n.png
  convert $n_n.png -transparent black $n.png
done
In the above script 22 is the pixel size of the images and ComicSansMSBold.ttf is the font to be used.
If you need to create more, single bitmaps at once, you may use a fontforge python script. I used to first load the font to be used into Fontforge and change the Encoding to Latin-1, mark the first 127 chars, invert the selection and delete the rest. Then save this as a Fontforge font file for later use.
Now you can use a small python script and export the remaining glyphs to single bitmap files:
import os
from fontforge import *

font = open(os.sys.argv[1])
font.reencode("iso8859-1")
for glyph in font:
  if font[glyph].isWorthOutputting():
    if glyph.isupper():
      name = glyph + "_capital"
    else:
      name = font[glyph].glyphname
      # or name it with ' + "_" + str(font[glyph].unicode)' added
      print ("glyph: " + glyph + ", unicode: " + str(font[glyph].unicode) + ", name: " + name + "\n")
      font[glyph].export("c:/temp/" + name + ".png", 22)
If you do not want to start this from command line, you may replace ‘os.sys.argv[1]’ by the path and name of your saved Fontforge font file or a TrueType font file. Be warned that you get many bitmap files now. Possibly do that within an empty new directory.
Now that you have your images ready, go on and start a watchface.
Assemble the Watchface
Start at https://docs.zepp.com/docs/guides/tools/watchface/guides/create/ and click watch face maker interface to get to https://watchface.zepp.com/. You need to be registered to be able to start a new watchface.
First you should select a name and which smart watch the watchface is for. Then, on create, you will get the Zepp Watchface Editor UI.
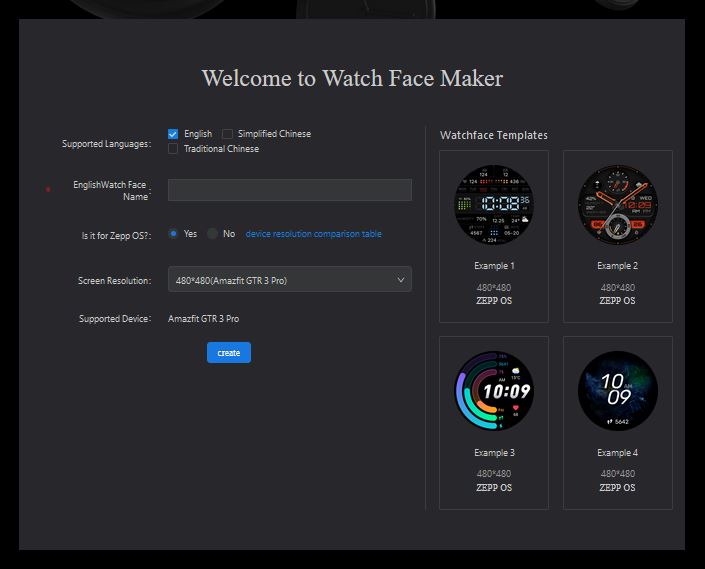
You may need to switch the option ‘Is it for Zepp OS’ to create a watchface for your smartwatch, i.e. the Amazfit GTR2. If your are ready, click on [Create] to start the editor.
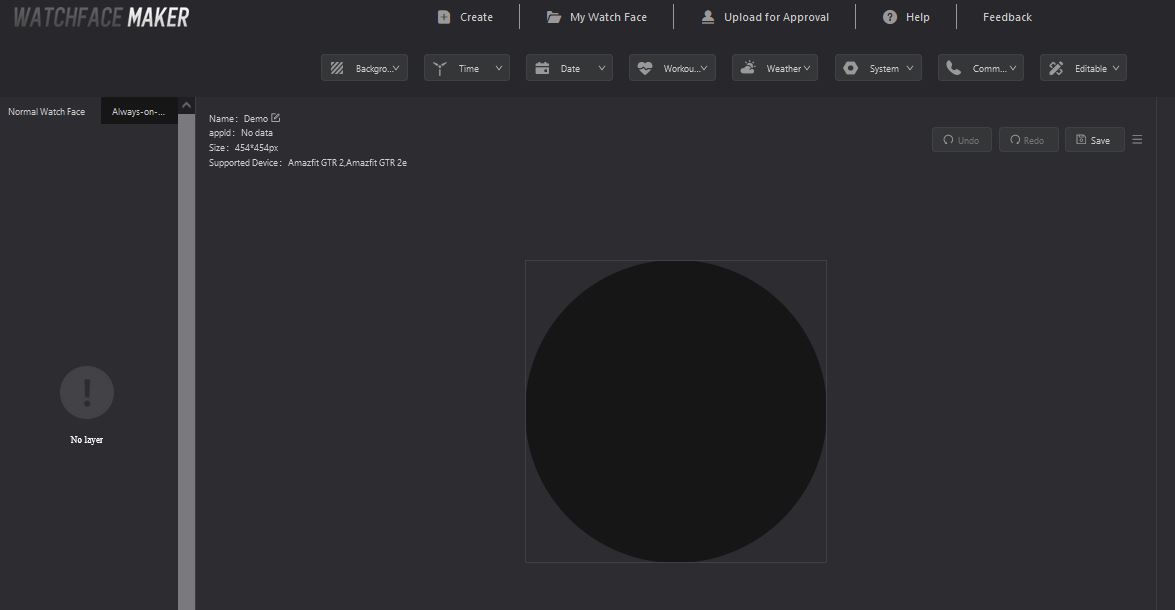
You get an empty preview of the watch. I am unable to explain all the options and settings. Let’s start with the background image of the new watchface. As said, it should be an image of the size of the smartwatch screen, i.e. 454x454px. Click on Background>Background to get a new background layer on the left side (the layer list).
The options for an layer element are set on the right side of the screen. For the Background layer we just need to upload the background image we want to use. Select Background Type>Image and click on the plus sign to upload your image file. A solid background would be just a solid color in the back.
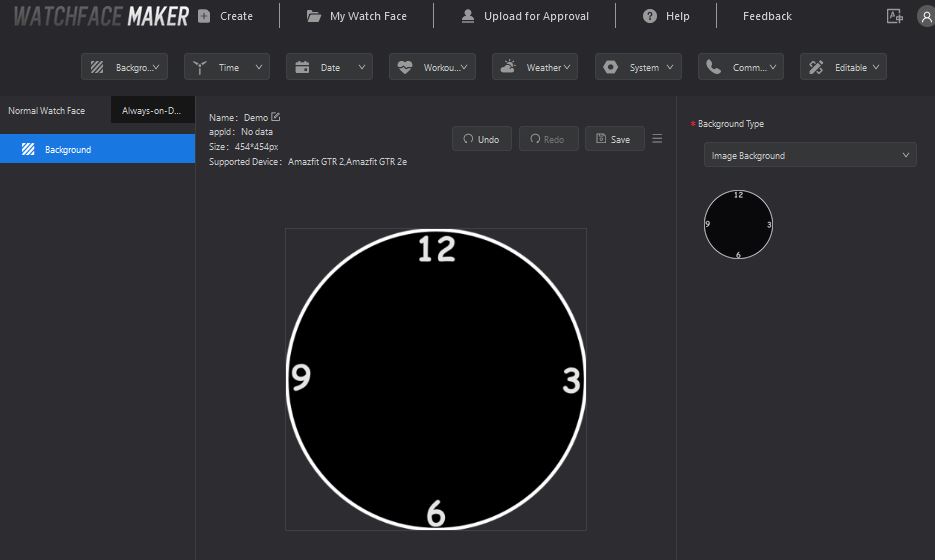
Here I uploaded a black round background with a white circle around and the digits at 12, 3, 6 and 9. If you need to replace the background, you need to delete the current background first by clicking the small Trash Can inside the preview of the background on the right side.
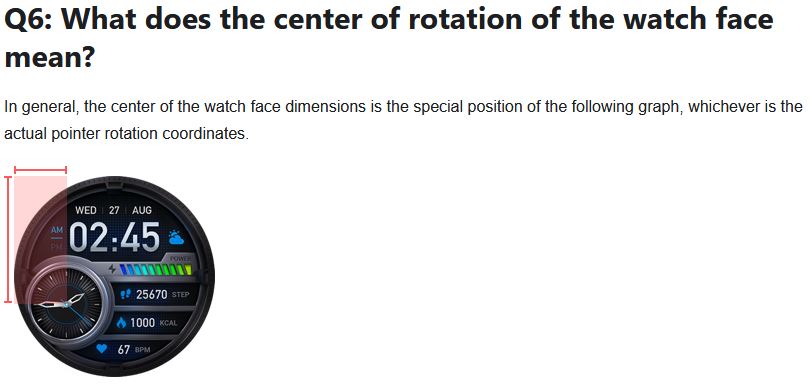
Now let us add a hour hand. It is a bit tricky, as we have to maintain some rules so the hand will rotate correctly with the time. But there is a nice example at the Zepp FAQ.
[https://docs.zepp.com/docs/guides/tools/watchface/guides/create/]
My pointer image for hour hand is 80x443px and the rotation point is at 40;227px. Click on Time above the preview and Pointer Timer to get a new layer. Then click on the arrow on the left of the ‘Pointer Time’ layer and then click check the ‘Hour Hand’ element. Now we see the properties on the right side.

Upload your hour pointer image and set the’Watch Face Center of Rotation’ to the middle of the background (equals the watch size) to 227;227px.
‘Pointer Center of Rotation’ which moves the 80×443 image into the watch. As we have a watch 454x454px and the hour hand image is 80x444px we have to enter x=80/2 =>40 and y=227-(454-443 / 2)=>222 (the center minus the height difference of our hour image) to let the hour pointer image rotate correctly.
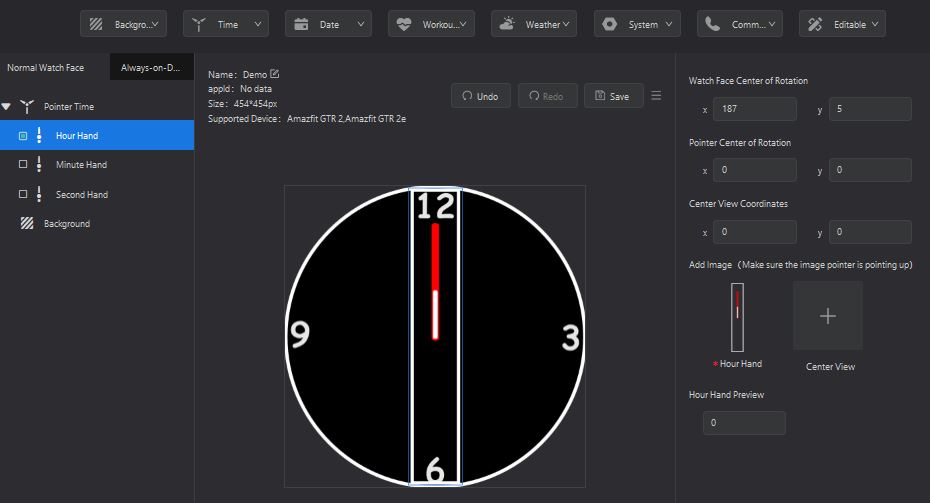
In the field ‘Hour Hand Preview’ you can enter a time and test the pointer. As you can see, we need to adjust the ‘Center View Coordinates’:
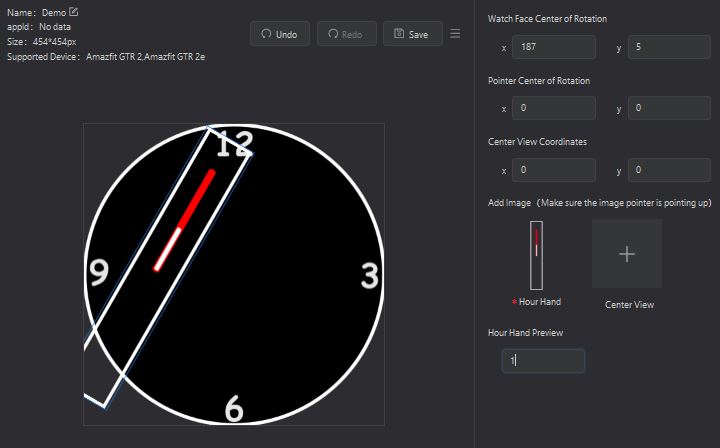
The ‘Pointer Center of Rotation’ our hour pointer image is a 40;222px:
You need to repeat the above for the minute and second pointer.
Using digital values
Now let us show the system battery level as numbers on the watchface. You need images for the digits 0 to 9 and a percent sign image. Click on System above the preview and then Battery Level. You get a new layer called Battery Level. Check the option ‘123 data’.
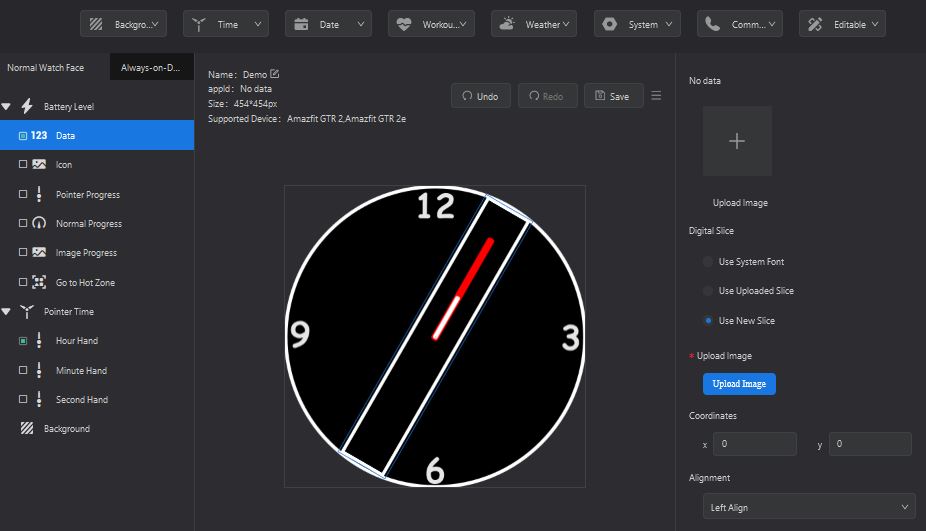
You may upload an image for the case no data is present by clicking the [+] below ‘No data’.
We want to use some uploaded ‘slices’ for the digits. So activate ‘Digital Slice’>’Use New Slice’. And the use the button [Upload Image] to upload the images 0.png, 1.png until 9.png. Do not use other names.
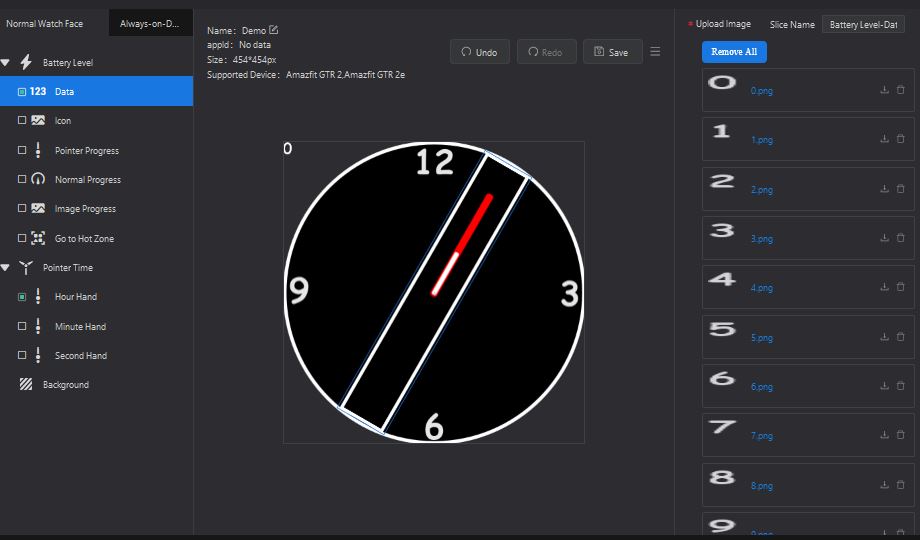
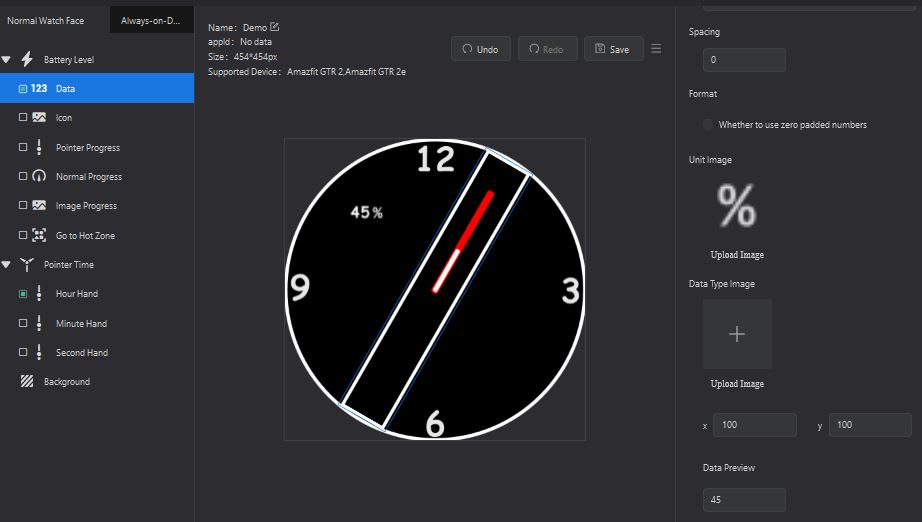
As the Coordinates are still 0;0px the data is placed in the top left corner. Lets move that a bit and enter x=100px and y=100px.
We ant to use a percent symbol as Unit Image, so we upload that. The ‘Data Type Image’ is something you may place above or below the battery level. For example a battery symbol or the text ‘battery’. In ‘Data Preview’ you may enter a test value to show.
Re-using uploaded slices
At the end of this writing I will show how to use the uploaded slices for another ‘123 data’. For example the temperature.
Add a Weather>Temperature element and select ‘123 Data Real-Time Temperature’ for this.
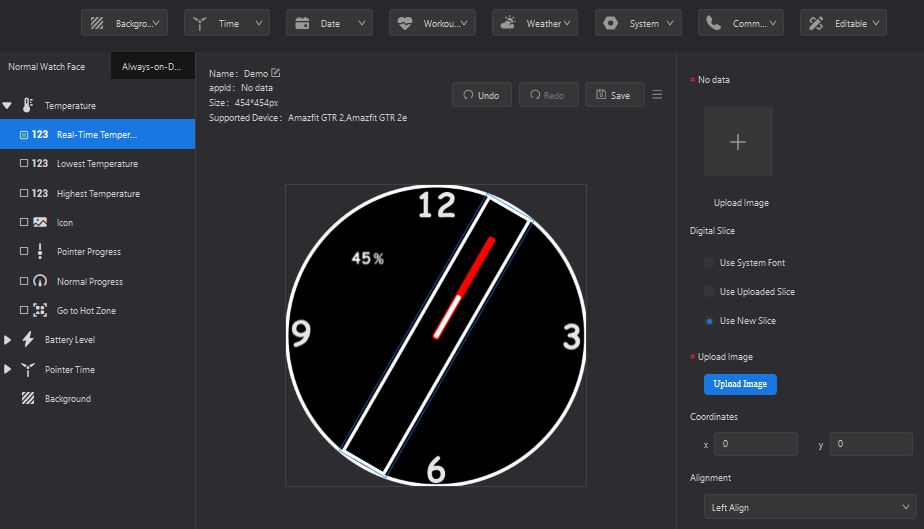
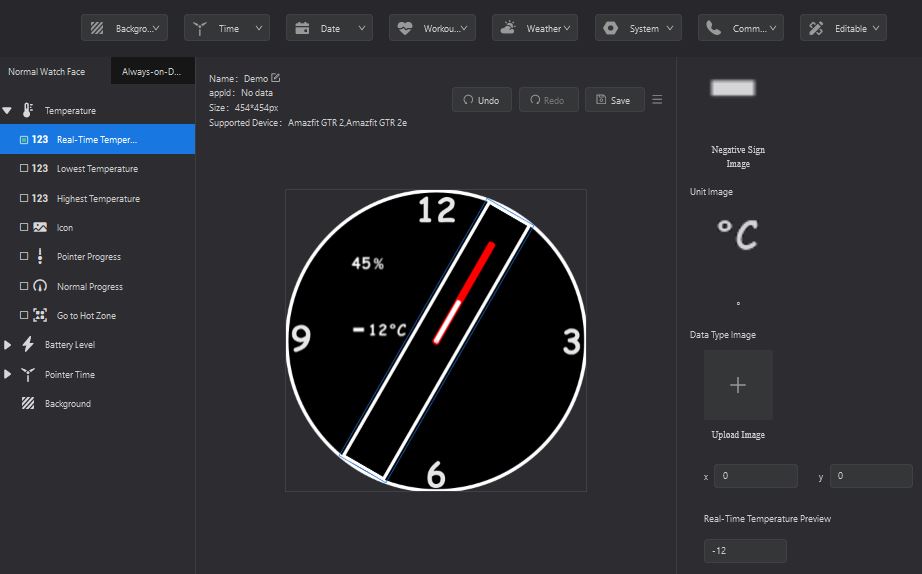
We need to upload a ‘No Data’ image, the item is marked with a red dot. For ‘Digital Slice’ we re-use already uploaded slices, so click ‘Uploaded Slices’ and below ‘Uploaded Images’ select the element ‘Battery-Level-Data’. Now this element uses the same digit images. No need to upload another set. After adding the mandatory ‘Negative Sign Image’, a ‘Unit Image’, entering the ‘Coordinates’ 100;200px and a ‘Real-Time Temperature Preview’ we get the following.


 http://www.led-mg.de